Blog Image

Thumper Diaries

About the blog

This blog is to be a diary of our activities and the trials and tribulations of owning a Royal Enfield Bullet 500. Your comments are welcome but there is a spam filter.
I hate spam.

For spares and such, I normally go to Hitchcocks Motorcycles

For a complete log (linked index) of all the posts in this blog, go here: Diary log

Rolling tool kit

Maintenance Posted on Sat, April 18, 2020 01:20:06

I had to do something to use my time while being locked down because of the dreaded Corona Virus. Looking to use that time well I decided to give Thumper the once over, checking lights, battery, oil, tyre pressures and all the ususal light maintainence one does before setting off on any trip.
All easily done and well worth the effort. Then I decided it would probably be a good idea to go through my spares and tools that I normally take with me out on the road.
I won’t be stripping tyres off hubs at the roadside or any other large repairs in the case of catastrophic failure but there are minor things that may crop up, so one has to be prepared to a certain limit. I pulled it all out to see what I had packed once a long time ago and luckily have never had to use..
I have some feeler gauges, a multi tool, chain lube, a spare plug, tyre repair goop, bulbs for an indicator and tail/brake light, a double ended screwdriver, an adjustable spanner and an assortment of spanners and some electrical ties. It all fits in the right hand tool box.

Besides this I have a mini pump for tyre inflation which is kept on the crashbar in a purpose built cradle to be used with the goop in the event of a puncture. I have spare fuses too. These are taped to the relevant fuse holders.

I need to get a cable repair kit and a new roll of duct tape.

As I said, I have never needed it so far, but it’s nice to know that one is, at least, a little prepared. I’d rather have it and not need it than need it and not have it….
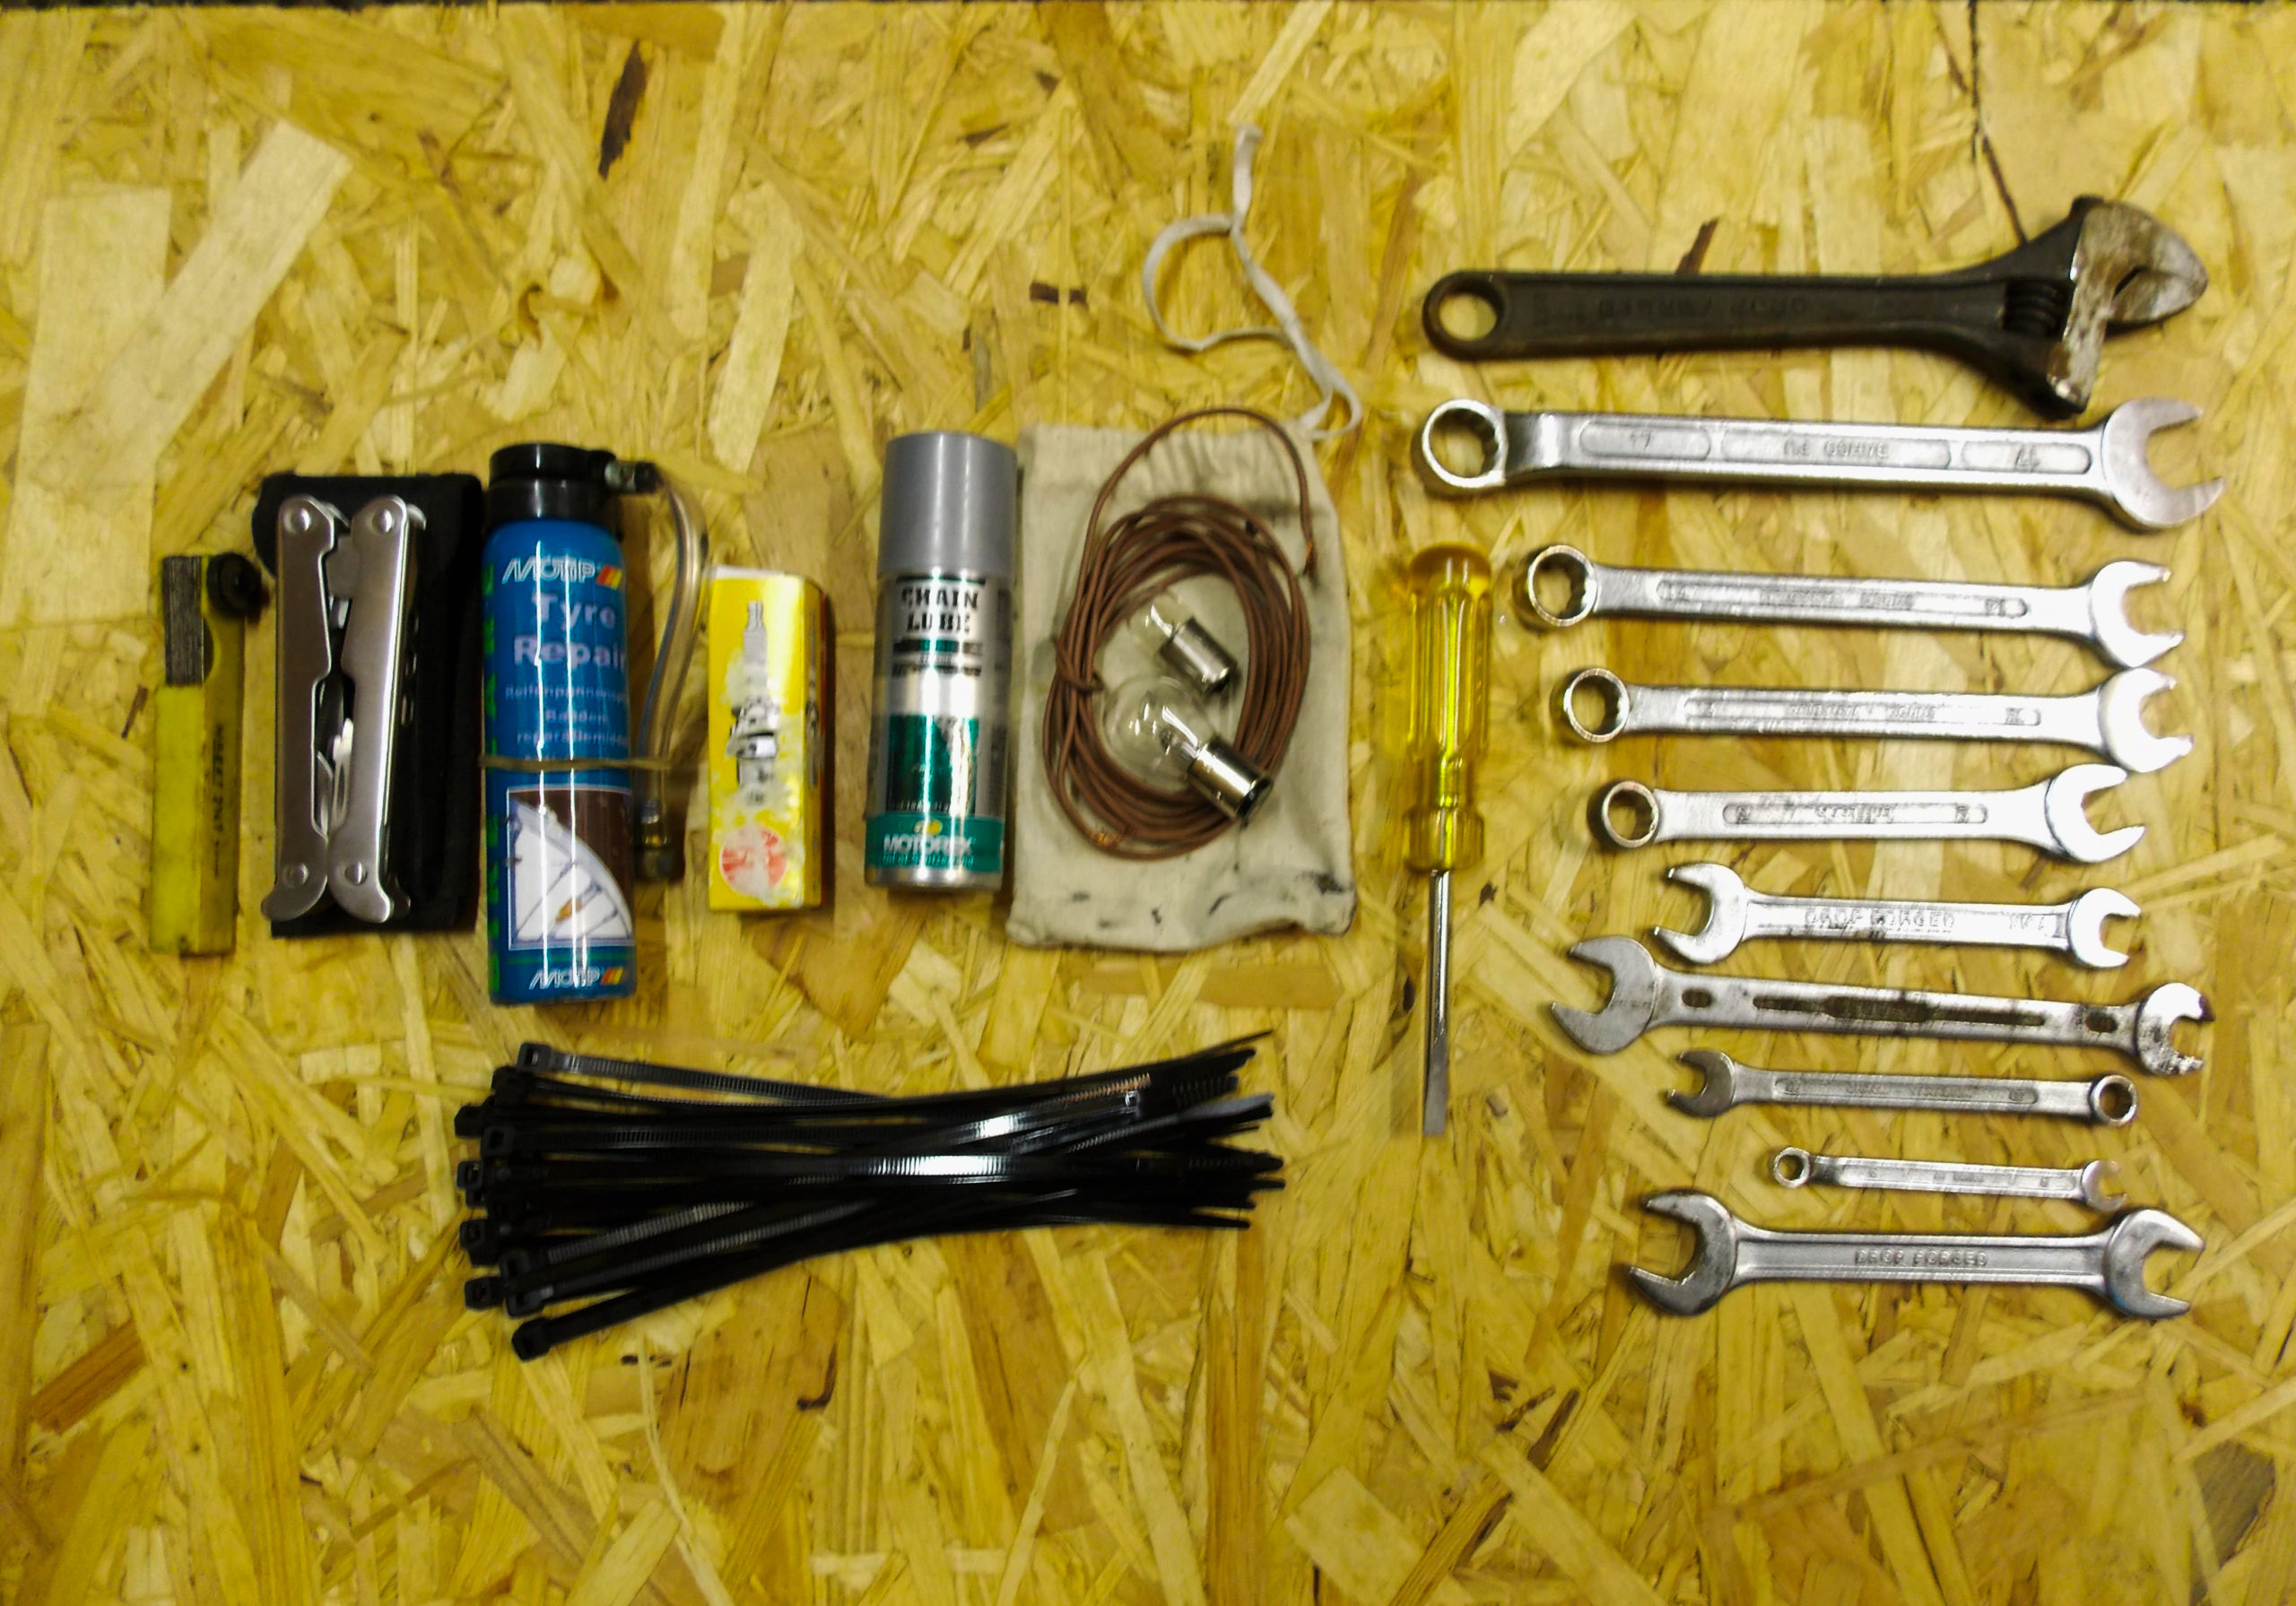


Under Pressure

Maintenance Posted on Tue, April 14, 2020 22:34:04

I normally carry a small hand pump with me on the bike in case of puncture. My emergency plan consists of the goopy stuff that one sprays into the flat tyre but one still has to get air in there too and my lungs aren’t up to the task. It is attached to the crashbars in a cradle made for just that purpose.
It has served me well but I felt the need for something more professional for use in the shed. I now have something…

My dear wife, having heard my lamentations over this state of affairs, bought me a mini compressor from Black & Decker for Christmas. A compact little machine which can be driven by mains electricity or from a 12V take off. It is a little cumbersome to take on the bike but for use in the shed it is superb. I can also carry it in the car, so it comes with me on longer trips. One never knows…
The air line and the electrical lead fold nicely away under the top cover and the 12V line is coiled up and packs away in the back of the body. The required pressure can be preset on the front of the machine. Very useful in case of emegency. Just to give a sense of size, the box measures 12″ x 6½” x 7½”. Here it is:

This is all very well but I also needed a compressor for other simple jobs like spray painting, a washer pistol, an air gun for dusting off and so on. Not having a tank that i could pressurise, I needed a real compressor. But not too big. The shed isn’t that large. I found one the other day. From Stanley. It will compress air up to 8 bar and will drive a rattle gun. Again, required pressure can be preset on the machine. Electrically driven, this one does what I require of it and is still very portable. I had to buy attachments for it but these are not expensive. A spray gun, a washer, an air gun, a tyre pessure gauge and air line all came in a kit at a very reasonable price.
I reckon I’m covered…


Wax on – Wax off

Maintenance Posted on Wed, August 29, 2018 00:14:10

I don’t normally endorse any products I buy. Most are equally as good as the next if one follows the directions on the tin, box or whatever. Occasionally one finds finds something that amazes one though. Such a thing happened today.

I recently switched cars. I traded my old Citroen in for a Volvo. It isn’t a new car by any means, but it is built to last. Anyhow, it has a few scratches on the paintwork. No dents, just small scratches. I went off to buy some scratch remover and the guy at the shop told me to put wax over the repair. Got any wax? I asked. Yes he did, recommending this stuff.

This is Meguiar’s Ultimate Paste wax. Apparently it’s a synthetic polymer wax and is particularly water phobic. I don’t profess to know a water phobic synthetic polymer if I see one, so I took his word for it.

The tin contains an applicator in the lid, a soft towel to polish with and a huge tin of the wax.
It worked on the car, which is a silver grey colour that doesn’t really show a shine other than reflection that one would expect from a grey paint.
So far so good and no surprises.

Having finished with the car, I thought it might be fun to try the wax on Thumper’s lovely big black tank. I normally rub Thumper down after every run so I know he’s clean. While I was there, I got carried away and waxed the mudguards, the fork covers, headstock and lamp and what bits of the frame i could get to and the tool boxes. Wait a few minutes for this stuff to dry, it says on the tin. I did.

Then I started polishing it off.

What a shine! Deep glossy reflections that I could use to shave in. Everywhere. Thumper never polished up like this before. Whoever Meguiar is, he’s a genius. His wax is great!

I won’t be using anything else to polish Thumper with in the future. Thoroughly recommended by yours truly. smiley


He lives again!

Maintenance Posted on Wed, May 23, 2018 17:56:24

After many hours chasing wires and checking connections, I could find no reason for Thumper’s lack of life. Then, in desperation, I connected a battery charger to the bike and lo and behold, power all over the place. I couldn’t really understand this, because the battery was showing me 12V on my meter.
Having voiced my consternation on the usual Hitchcocks forum, someone suggested a new battery may be all that is required.
Well, having tried everything else, what choice did I have?
New battery bought today. Twenty quid or so.
I connected it all up. Put the charger on to top up the new battery and, after an hour, I thought it was time to try and start him.
The usual routine, fuel on, ignition on, set him to run, start help activated. Decompress and turn it all over two or three times. Here goes…

One kick!

That’s all it took. Thumper fired up and barked his thunder for all to hear. Once again, I ran around outside the iShed with arms in the air whooping with delight..
Joy unbounded!
Then a quick roar around the block to check that all is well. It is. Tyre pressures had fallen in the nine months of idleness but otherwise, no problems.

The weather is particularly nice at the moment. It’s going to be a long day on the coast road tomorrow.


Electrickery

Maintenance Posted on Sun, February 25, 2018 20:48:16

Someone left a comment on one of the posts here, inquiring as to why I have seemed to stop posting.
The answer is very simple, although the solution to my troubles is likely to be not so simple. Thumper is out of commission at the moment. Indisposed. Broken down.
Not mechanically, I hasten to add. No. It’s the dreaded electrics.

I don’t know much about the mysteries that are electric. Thumper just cut out and died and is bereft of all power. The battery appears to be OK so I presume something shorted out and remains so. There is no life in him anywhere.

Danish winters are remarkably cold, even when they are mild, so spending hours in the shed is out of the question for the moment. As soon as the weather warms up, I’ll be on to it.

I have no idea where to start…. this will be a long process.


Fuel consumption

Maintenance Posted on Fri, May 26, 2017 01:27:30

Something I do worry about is the amount of fuel I have left in the tank. I have no fuel gauge to go by. I know that if all goes according to plan, when Thumper stutters and dies out on the road, I need only to turn the fuel tap to ‘reserve’ and I can continue on to the nearest petrol station. Hardly comforting though, as I don’t really know how much fuel I have in reserve!
For the past year I have been keeping an eye on the mileage (or should that be kilometerage?) compared to the amounts of fuel I put in the tank. It is not entirely accurate as one cannot guarantee that one always fills up to precisely the same level in the tank, but it is close enough to draw some sort of conclusion.
My preferred fuel is Shell V-power. It may be a little more expensive but it is of a slightly higher octane content and burns very cleanly. Thumper loves the stuff and he runs sweetly on it.

My conclusion is that I cover about 24 Km/litre. In old money that is about 69 MPG, allowing for my limited maths skills and uncertainties as mentioned above.
Thumpers tank holds 14 litres of fuel. That’s a little over 3 gallons.

My range then, is around 336 Km or 207 miles. Not too shabby. Eh?

So I’ll be filling up every 250 Km or so from now on. Now, where did I put that notebook..?


Oil Suction Gun

Maintenance Posted on Mon, May 08, 2017 21:08:16

Here’s a great little tool, made for oil changes. I wasn’t really looking for it but when I do find these handy things, I buy them. Even better, it was on offer at about half price.

Remembering the problems I had with filling the timing chest under the last oil change, and seeing that this thing holds up to a half liter of oil, which is what the timing chest needs, how could I say no? I had solved the problem last time by doctoring a half liter water bottle. It worked, yes, but it was far from ideal.

I won’t necessarily be using it to remove oil but it certainly will help with filling the timing chest which is pretty difficult to fill through the push rod adjuster hatch. I can’t pour horizontally…

The plastic tube is about 3/8 inch bore and can be replaced by whatever length one wants.

Another practical application, of course, is that if one overfills the sump at oil change, this can easily remove some of the oil.


Removing the Dent

Maintenance Posted on Wed, August 31, 2016 19:26:03

I was forced to step off a while back. By a female jogger who had made herself deliberately deaf to the traffic by using ear-buds and blind by looking at the indispensible iPhone in her hand. She ran out in front of me and I was forced to drop the bike to avoid wiping her off the face of the earth. Luckily, I wasn’t going that fast.
The resulting contact with the road wasn’t too bad but my left knee caught the tank and left it with a sizeable dent. That was two years ago. Here’s the offending blemish.

Finally annoyed enough to do something about it, I decided to consult a professional. Not easy, because the body shops are good at cars but are, for some reason, unwilling to take on bikes. I finally found a newly started business and approached them. Reluctantly, they agreed to take on the job. I met up at ten in the morning and waited for the youngster to have a look at Thumper’s dent. “I’ll try.” he said.

I explained that I had seen a hot glue puller thing on the TV. He agreed that would do the job and so he got started. “My first bike.” he explained. “I know.” I said. Reassuring him that I knew the risk involved and would hold him blame free in the event of a catastrophic failure of the paintwork, he applied the glue and the tap and got to work with the puller.

Two minutes later and the dent was gone. He then got to work with a dorn and a hammer and dressed the area around the now non-existant dent. The result was about as close to perfect as anyone could get. The dent is gone for ever. Here’s the result.. Nothing to see.


There are those who would try to do this as a DIY project. There are kits that can be bought and there is also a process of heating the area and then rapid cooling with compressed air. I’m sure some will have had some success with this. I tried the heat and cool thing mysef but it didn’t get the dent out despite my concerted efforts.

In the end, I’m glad I went to a pro. We both learned something and, for him, my money is as good as the next mans. Maybe they’ll take more bikes now.
My sincere thanks to the young man who did the job. He’s a clever lad. I hope the business does well.


Out With The Old..

Maintenance Posted on Fri, April 17, 2015 23:49:26

..and in with the new. Oil, that is.

It isn’t easy finding 20w/50 oil in Denmark. In fact, it’s virtually non-existent for some strange reason but being a stubborn old sod when I need to be, I found a supplier in Jutland. Jutland is a bit like a foreign country for us here on Zealand but they do have Castrol in real tin cans. I ordered a gallon.

I’ve never done the complete oil change on Thumper before. OK, I drained the sump once and the tank, if you can call it a tank but this time I drained the pump and timing chest as well. A lot of very black oil came out but no swarf. Which means that all is well inside the engine. I didn’t strip out the pump though. Thumper has only done 2300 miles (3700 km) so it shouldn’t be necessary until next time, or so I am told.
Getting the old stuff out is relatively easy. Remove the three drain plugs under the engine and the quill bolt at the bottom of the timing chest. Then leave it to drain for a half hour or so..

According to the manual, the whole engine holds 2.25 litres. About 5 pints in old money. For those that may be interested, a gallon is 3.8 litres

Filling it up again was a bit more problematic. To avoid a dry start, it’s a good idea to refill the timing chest. One can pour oil in through the push rod cover but how does one pour horizontally? One doesn’t. I fashioned a syringe like affair with a half litre water bottle and a piece of neoprene tubing. Bore through the bottle top and insert the tube. Make sure it’s a tight fit. Fill the bottle and put the cap on. Insert the tube into the push rod channel and squeeze the bottle. It takes a while, but it works.. After that, simply fill the engine with the remaining 1.75 litres of oil and the job is nearly done.
Start the machine and let it run for five minutes or so, checking for leaks. Stop the thing and wait a while. Pull the dipstick and see if your level holds true. Mine did.

Job done. smiley


Broke Brake

Maintenance Posted on Sat, June 07, 2014 18:03:51

Sometimes my own eagerness catches me
out…

Having decided I needed to exchange my existing tyres for something more
rounded and modern I contacted my local workshop and asked if they could order
and fit tyres for both front and back. Indeed they could but they didn’t have
anything that fitted a piece of British iron, so they had to order something
extraordinary in relation to their stock. Two weeks later, the guy rang me up
and explained that he couldn’t find a tyre for the rear wheel, did I have any
ideas? Yes I did, and duly pointed him in the right direction. Another three
days passed and they were ready for Thumper.
I delivered him early in the
morning and rang later to hear if they were finished. Yep. They were.. but.. one
of the counter salesmen had sold my front tyre in the meantime while we were
waiting for the rear, so the job is only half done…

Bugger!

Oh well, I collected Thumper and we are still waiting for a new tyre for the
front wheel.

I got him home and looked at the state of him. Covered in greasy
fingerprints. I decided to polish him up and get rid of the offending blotches.
Putting Thumper on the centre stand I got busy with the rag and wax and, soon,
he was looking fine again. Then I did something stupid. Taking him off the
stand, I let Thumper fall away from me, I couldn’t hold him and the brake lever
snapped like the proverbial carrot.

Here’s a picture of the resultant injury. I immediately ordered a new one
from Hitchcock’s and had to wait five days for the part to arrive. It arrived
today and I’ve fitted the thing already. So I can ride again.

Lessons learned: Don’t take the bike of the stand unless you are astride the
bike. Cast alloy is weak as s***. I now know how to fit a new handbrake
lever.

Whatever doesn’t kill me…!

And I still haven’t heard from the workshop about my new front tyre….


Next »