Blog Image

Thumper Diaries

About the blog

This blog is to be a diary of our activities and the trials and tribulations of owning a Royal Enfield Bullet 500. Your comments are welcome but there is a spam filter.
I hate spam.

For spares and such, I normally go to Hitchcocks Motorcycles

For a complete log (linked index) of all the posts in this blog, go here: Diary log

GPS – Tomtom Rider

Customisation Posted on Sat, March 28, 2015 17:09:23

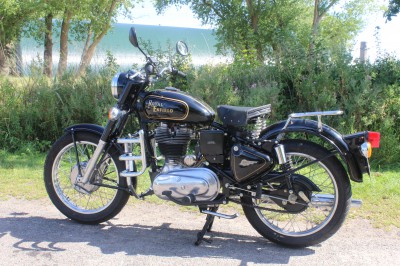
I got this for Christmas. I have one in the car but never thought I might have one for the bike. I didn’t think I’d ever need it. Still, not wanting to look a gift horse in the mouth I decided to fit the thing and see if it would prove itself to be useful.
The handlebar mount isn’t exactly elegant. In fact, it looks amateurish. If I was to design something to hold this expensive piece of kit, I would have put a design team on the job instead of presenting the almost bodge job that it is. Oh well, you use what you have. Here it is..

According the somewhat sparse instructions that follow the GPS, the only thing necessary, is to find a wire that goes live with the ignition on. Connect the live side to that and then find an earth for the other wire. I looked behind the headlamp at the birds nest of wires and gave up before even attempting to unravel it and identify the ignition wire. Hook it up to the battery, I thought. The damn thing can be switched off so no problem.

But then there was. A problem.

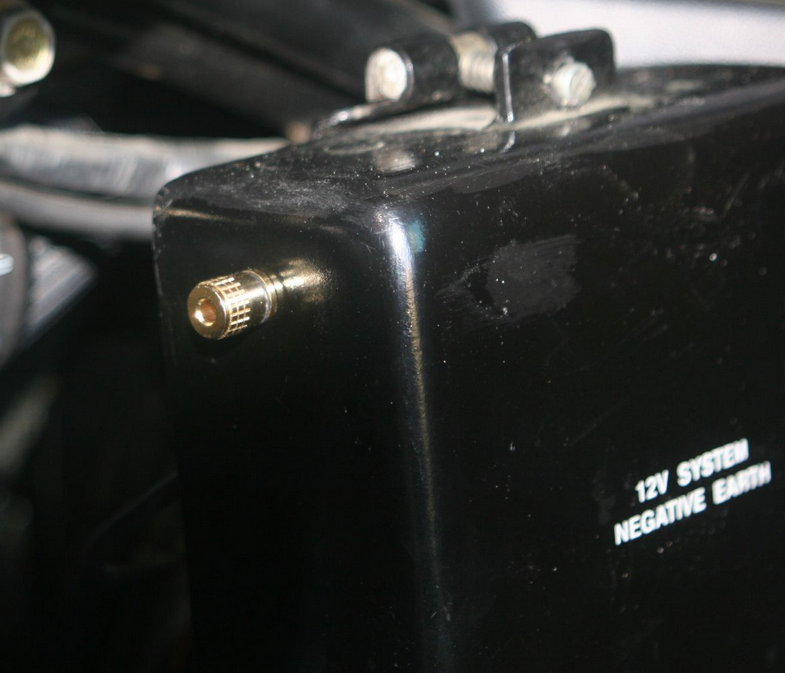
The screen unit sits on a plinth, or base unit or whatever it may be called. Even though the screen unit is switched off, the base unit draws a current. That current flattened Thumper’s battery in the run of a week. Here’s the base unit:


And with the screen unit fitted..

So… Plan B.
Simple, I thought, I’ll put a switch in between the base and the battery. I know that will work, but… where to put the switch?

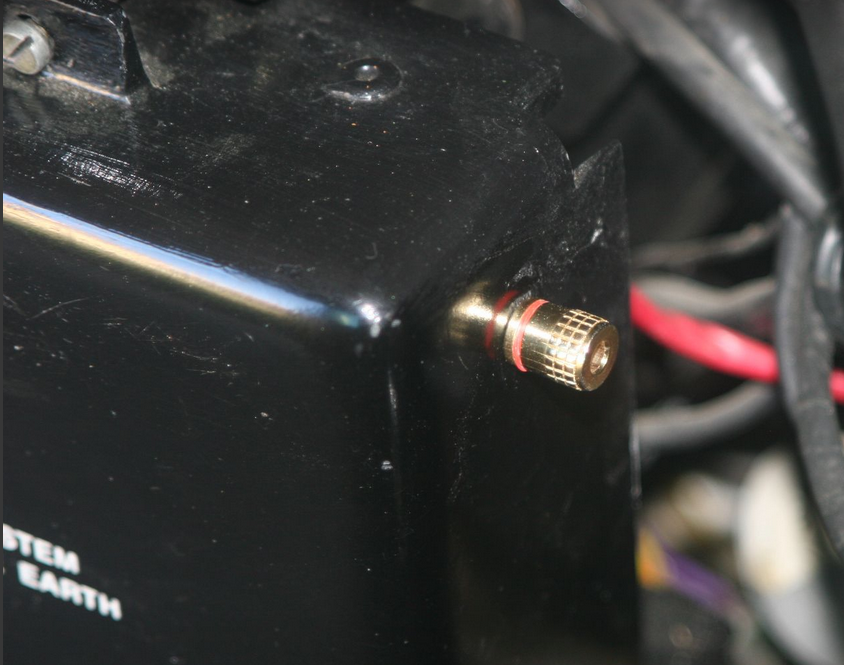
Not wanting to clutter the headlamp nacelle more than it already is, I decided to mount a switch near the battery. I thought about using the battery box but decided there wasn’t room there, so the next idea involved making a plate to mount on the back of the battery box and place the switch there. That was simple to manufacture out of some thin steel plate and it is held in place by two pop rivets. Luckily, I have all the requisite tools and material and a little know how.

I measured the distance at which to separate positive lead and fitted spade connectors to fit the switch. The switch screws into the plate. A lick of Hammerite and the job is done.

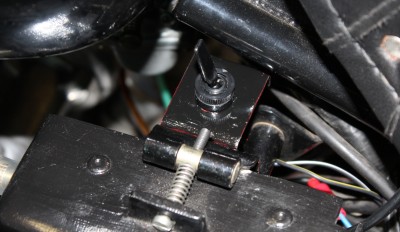
Just to be sure it worked, I started Thumper and tried to switch the GPS on. Nothing.
Flicked the switch and bingo.. all worked as it should. Switch off and the GPS powers down.

Cracked it!

All I need to do now is plan myself a tour across the water to Sweden and take a weekend in the woods.. Bring on Summer. And, an added bonus, I can check my speedometer with the GPS.

More on that later..


Going Electronic

Customisation Posted on Thu, November 06, 2014 22:55:17

I’d heard a lot about electronic ignition. If you’re not the type who enjoys playing around with the ignition and points and so on then this may be the way forward. I’d heard that once fitted, you can forget all about it. Set it up once and that’s it. I went off to investigate..

I found a Boyer Mk4 electronic ignition unit at Hitchcocks. I rang them up. I’m not an electrical wizard so I needed some reassurance that even I could fit the thing if I bought it. I was told that even without the advanced strobe timing light and such, it was easily done if one followed the instructions that come with the unit. I was also told that any technical support, if needed, was only a phone call away. That said, I ordered the thing.

There’s not a lot to it. A sealed box unit of electronic wizardry with 5 wires hanging out of it, two plates, (one metal with magnets, one plastic with two coils and wiring hanging off said coils) and a bolt. It all looked innocent enough.

Instructions were simple enough too. Disconnect the battery. Then I had to dismount the saddle and my electrics cover to get to the coil. Then I had to identify the positive side of the coil. My eyes aren’t what they were but eventually I found a ‘+’ mark. So far, so good.
I mounted the unit in the left hand toolbox, drew the wiring out though the back of the toolbox and proceeded to hook it all up. One wire goes to earth, one to the coil, two to the electronic timing plate and one to the old wire that connected to the old points. That bit went well enough.
The points and auto advance mechanism has to be removed from the distributor and then you have to find top dead centre. I have a tool to help me with this.

Once found, the metal plate with the magnets gets mounted on the distributor spindle. Insert the bolt but don’t tighten it fully yet, according to the instructions. Then mount the plastic plate and set it up turned as far anticlockwise as it can be. Then you line up the magnets on the metal plate with the coils on the plastic plate so they all form a direct line across the plates. Tighten the metal plate and then rotate the plastic plate clockwise to midways between advance and retard. Tighten everything. That’s it.

With a good degree of trepidation, I decided to fire it up. Reconnect the Battery, fuel on, ignition on, kill switch to ‘run’, start help on and give it a swift kick.
OK, two kicks..
VROOM..!! Thumper fired up! Success. Woohoo! I ran round the shed with my arms in the air…

Then I had to reassemble the bike with all the bits I’d pulled off it to make the wiring and so on accessible, but what the hey, that was the easy bit.

I think I got lucky. I didn’t have to adjust anything or fiddle about with the plates to get the timing right. I think I was lucky enough to have hit the nail on the head at the first try, which is not something I’m used to but the simple result is that I converted Thumper to electronic ignition within hours and he runs like a good ‘un.

Which proves that even with as limited electrical skill as I have, anyone could fit this sort of thing.

Roll on Springtime…

Update 11/11/2014

I took Thumper out for a test run today. It wasn’t good at the start. Misfires and poor acceleration. I was ready for this and made roadside adjustments to the timing, advancing it slightly. The difference was tremendous. Ready response, even tick over and an eager engine that wants to run and run quickly. Had it not been so cold, I’d still be out there.
This is a success.


Lean and Mean

Customisation Posted on Thu, July 24, 2014 12:34:41

After having replaced the broken brake lever I decided it might be a good idea to get a side stand for Thumper. It may make getting on and off easier and it certainly helps when I need to park at the roadside.
I went for a big and sturdy part in chrome and fitting the thing took only seconds, which was a great relief as I had expected a heap of work to hang the thing on the bike frame.

There are no instructions that follow these parts so one has to look carefully at the possible mountings. The left hand side foot peg and spacer have to come off and the nut holding the centre stand. The bracket that carries the side stand then fits neatly on the two protuding studs, the spacer and foot peg are then replaced and the two nuts are put back in place. Nip it all up tight and the job is done. Never has anything been so simple.

My only complaint is that the side stand does make getting the centre stand down a bit more difficult as the ends of both stands almost touch. The manual does state that one should place the bike on the side stand before attempting to use the centre stand. I suppose that makes sense in some weird way but I would like to have the chance to make my own mind up as to which I prefer, depending on how and where I’m going to park. Not only that, but one has to think a bit before pulling away to ensure one has not forgotten to kick the side stand back up after using the centre stand..!! You wouldn’t want to corner hard to the left with the stand down.

Another point to note for all us amateurs; never run the engine for any length of time while the bike is on the side stand. It plays hell with the oil circulation as the oil in the sump is naturally draining away from the oil pump as the bike leans to the left.


Broke Brake

Maintenance Posted on Sat, June 07, 2014 18:03:51

Sometimes my own eagerness catches me
out…

Having decided I needed to exchange my existing tyres for something more
rounded and modern I contacted my local workshop and asked if they could order
and fit tyres for both front and back. Indeed they could but they didn’t have
anything that fitted a piece of British iron, so they had to order something
extraordinary in relation to their stock. Two weeks later, the guy rang me up
and explained that he couldn’t find a tyre for the rear wheel, did I have any
ideas? Yes I did, and duly pointed him in the right direction. Another three
days passed and they were ready for Thumper.
I delivered him early in the
morning and rang later to hear if they were finished. Yep. They were.. but.. one
of the counter salesmen had sold my front tyre in the meantime while we were
waiting for the rear, so the job is only half done…

Bugger!

Oh well, I collected Thumper and we are still waiting for a new tyre for the
front wheel.

I got him home and looked at the state of him. Covered in greasy
fingerprints. I decided to polish him up and get rid of the offending blotches.
Putting Thumper on the centre stand I got busy with the rag and wax and, soon,
he was looking fine again. Then I did something stupid. Taking him off the
stand, I let Thumper fall away from me, I couldn’t hold him and the brake lever
snapped like the proverbial carrot.

Here’s a picture of the resultant injury. I immediately ordered a new one
from Hitchcock’s and had to wait five days for the part to arrive. It arrived
today and I’ve fitted the thing already. So I can ride again.

Lessons learned: Don’t take the bike of the stand unless you are astride the
bike. Cast alloy is weak as s***. I now know how to fit a new handbrake
lever.

Whatever doesn’t kill me…!

And I still haven’t heard from the workshop about my new front tyre….


Air!

Customisation Posted on Fri, May 09, 2014 22:17:00

I suppose I’m not the only one who worries about getting a roadside puncture. I have a can of that liquid puncture repair stuff that one simply squirts into the punctured inner tube through the air valve but how does one re-inflate the tyre? Not wanting to carry a large foot pump with me on my travels I needed something smaller but equally effective. I found it the other day. A cycle pump, almost like the ones available for push bikes. It is really compact, no more than 9 inches long, has a built in pressure gauge and comes complete with a mounting bracket which can be attached to Thumper’s frame. The bracket is great to have as the pump is too long to fit in the tool boxes.

Here it is:

Folded out and ready for use, it looks like this:

I mounted the bracket on the front of the frame with zip ties, allowing room enough to not foul the steering. I had to customize the bracket slightly to let the ties fit securely round it but, all in all, I reckon it turned out very well. It sits discreetly out of the way but is still easily accessible if I ever have the need to use it.


A Great Day Out

Travels Posted on Wed, April 30, 2014 21:15:38

We’ve been having some lovely weather lately but, alas and alack, today might be the last chance for a ride out for the next week or so. Deciding to take a chance on it, I brought Thumper out of the shed and set forth to visit an old mate who is a bit poorly after having been operated on for a bad ear. He’s going to be off work for the next month because he’s off balance and partially deaf, albeit temporarily. He lives about 85 kilometers away and the ride to North Zealand is fairly pleasant, even in the winter. Open roads and very little of urban disturbance make for a good day out.

Avoiding the motorway is not exactly easy from my home as the bridges off the island are either right in the centre of Copenhagen or carrying the motorway but I can reduce the amount of mileage I cover on them by turning off of the main route as early as possible and then take the ring roads round the city. Open country is not that far away.
Once you get off the ring roads, you’re out in the open on country roads. Holding a steady 80KpH where possible, I reached my pal after an hour and a half, including a ten minute stop to get off the bike and regain some circulation in my backside.

We sat and spoke for about an hour, he assured me he’ll be fine and then I left to visit my daughter, 13 km further down the road but actually in the homeward direction.
A cup of coffee and a good chat later, I started on the return journey.

Strangely, the only real traffic I encountered was on the last section of motorway close to home. Slow moving and concentrated, I made better time on the ‘A’ roads than I did on the E20 to Kastrup. The final 20 kilometers took me an age to get through.

Thumper never missed a beat all day. Solid and steady, I never had a moments concern for the bike. The more I ride him, the more relaxed about his performance I become. I find myself truly beginning to trust him.

Roll on Summer. We’ll be doing much more of this.


Charge!

Customisation Posted on Tue, April 15, 2014 17:13:26

Not that I’m storming into the middle distance with all guns blazing.. just that I wanted to make it a bit easier for myself if I need to put Thumper on trickle charge every once in a while.

Instead of having to remove the battery box every time, I have fitted two charging poles to the box and wired them into the battery terminals. Now I can connect the charger with a couple of banana clips and I can also check the voltage with a touch of my voltmeter. An added bonus is, that I have a 12v take off if I need it without having to get the cover off.

I separated them to each side of the box so I don’t risk dropping anything across the two poles and cause a short circuit. Negative on the left, positive on the right. The whole job cost me pennies and the only hard part was the soldering.
Here’s the result:

br>


Springtime!

Travels Posted on Mon, March 31, 2014 18:19:37

The clocks went forward this past weekend, which means it’s officially summertime. The weather seems to have turned for the better too so in lovely Spring sunshine, 15°C and a light breeze from the West, I decided to take a day out at the seaside. It’s not really that far away anyway, so why not take a peek?
It was gorgeous. I met a few other bikers on my travels including an elderly gent of 78 years on a chinese chopper. As he said, “I can’t walk that far these days but I can still ride the bike.” Respect to him..

We compared machines. He was impressed with Thumper, I praised his machine. He said he’d had it for five years and has never taken a spanner to it. I told him I have owned Thumper for a year and I’ve made a few moderations. He looked and nodded his approval. “Nice bike.” he said, “I wish it was mine.”

Anyway, we had a good day out, the weather was lovely, Thumper went like the wind and sounded like thunder. This is what life should be like.

Here’s a couple of pictures of Thumper at the waters edge..


Thumper’s New Home

Maintenance Posted on Mon, March 17, 2014 22:00:17

No, I haven’t sold him. I’ve built him a new home. Or, rather more to the point, I’ve rebuilt and insulated the shed that he lives in. It’s insulated all round, including the new roof, and it looks great inside.
I need to get a solid floor down to be absolutely done with it but for now, the old shed is looking like a palace inside. Big neon tubes under the ceiling give me some light to work by and I intend to build a workbench at the far end of the shed. I need to get some electricity in there too. At the moment I’m using a very long extension lead.

This is a job I’ve been intending to do for years. I always wanted a workshop and having Thumper to look after just made that all the more imperative.

The whole job has taken some time and not a small amount of money but hey, you can’t take it with you and I reckon it’s well worth the investment. I’m looking forward to getting my larger power tools in there and really getting something done.

Welcome home Thumper.


Oh, Bugger!

Maintenance Posted on Sat, February 22, 2014 23:45:06

It was all going so well. Then Thumper wouldn’t tick over properly and he just didn’t sound healthy. Deciding that I needed to adjust the tickover I began playing with the air screw and throttle stop on the carburettor. No matter what I did, I couldn’t get him to run properly. Finally, I decided that the carburettor would have to come off and be looked at.
Then I found this:


The intake manifold rubber is split open. It has been on the bike since new and, according to advice I have received, this is a common problem.
It doesn’t explain why the engine is running rich though. I would have thought it would be running lean due to the false intake of air so I may have to strip the carburettor and move the fuel needle down a tad to get my fuel right. Time will tell, but right now I have to replace the manifold hose.

Quick update:
Nice sunny day today, so.. as the carburettor was out anyway, I moved the stop on the main jet needle to a leaner setting just for the hell of it. Not a difficult job but you need a steady hand! It may solve the rich running…


« PreviousNext »